项目 3 我们需要实现一些 Executor 来执行 Query Plan:
- Sequential Scan
- Insert (Raw)
- Insert (Select)
- Update
- Delete
- Nested Loop Join
- Hash Join
- Aggregation
- Limit
- Distinct
我们会使用的 Iterator query processing model 来实现,即 Volcano 模型。在这个模型中每个 Executor 都实现了一个 Next 函数,每次执行 Next 函数时,Executor 要么返回一个元组要么返回一个表示没有更多元组的标志。
项目说明书:https://15445.courses.cs.cmu.edu/fall2021/project3/
TASK #1 - EXECUTORS
这是本项目的唯一一个任务,实现项目说明中指出的 Executor 即可。项目 3 相比于项目 2 的难度系数下降很多,一开始可能会由于 API 不熟悉导致无从下手,但实际上思路都是很简单的,在写每一个 Executor 之前,先把对应的 Plan 的源码看一下,碰到不懂的地方可以从测试文件看起,看如何手写一个查询计划,思路就会清晰很多。下文中会将常用的 API 简单的给出。
而且本项目中有很多工具都是已经写好的,我们只需要实现 Next 函数和 Init 函数就可以了,所以通过 Autograder 后最好还是将整个代码全部都过一遍,可以理解的更加深入。
Sequential Scan
根据 Hint,可以知道需要借助 TableIterator 来遍历一张表,查看源码可以发现 TableHeap 类中有 Begin 和 End 函数可以获取对应的迭代器,所以我们可以在初始化的时候将 Executor 中迭代器设置为 Begin 的位置,接着在执行 Next 函数的时候遍历整张表即可。跟表或索引有关的信息都在 ExecutorContext 中。
注意我们遍历时需要判断是否满足 Predicate 条件:
1 | while (table_iterator_ != table_info_->table_->End() && plan_->GetPredicate() != nullptr && |
当满足条件的时候,要根据执行计划的 OutputSchema 来生成元组:
1 | std::vector<Value> values; |
Insert
这里需要实现两种 Insert:
- RawInsert
- SelectInsert
在 Insert Plan 中有一个函数 IsRawInsert 用来判断是哪种 Insert,如果是 RawInsert 表明不需要执行 Chlid Executor,直接调用 TableHeap 的插入函数将查询计划中的数据插入到表中即可,而如果是 SelectInsert,那么就要先初始化 Chlid Executor,再从 Chlid Exceutor 取出元组并插入。
在表中成功插入元组后,还需要在索引中插入一个 Index Tuple:
1 | auto indexes = exec_ctx_->GetCatalog()->GetTableIndexes(table_info_->name_); |
Insert 中有一个很大的坑,就是虽然测试文件中没有写Insert Executor 不能修改 result_set,而且测试文件中 insert_plan 中的 result_set 也是 nullptr,但是在 Autograder 中有几个测试的 insert_plan 中的 result_set 并不是 nullptr,这个时候就会出现错误。所以需要一次性将所有数据插入元组再直接返回一个 False 给 Exceutor Engine,避免将数据插入到 result_set 中。
Update
Update Executor 必定会有 Chlid Executor,所以在初始化时也要将 Chlid Executor 初始化。每从 Chlid Executor 中拿出一个元组都调用 GenerateUpdatedTuple 函数来生成更新后的元组,再使用 TableHeap 的更新函数即可。如果更新成功,要将索引中更新前的元组删除,再插入更新后的元组,所以需要记录更新前的那个元组。Update Executor 同样也不能修改 result_set。
Delete
跟 Update Executor 非常类似,每从 Chlid Executor 中拿出一个元组都调用 TableHeap 的 MarkDelete 函数(真正的删除在事务提交时执行)。再将索引中对应的元组删除即可。
Nested Loop Join
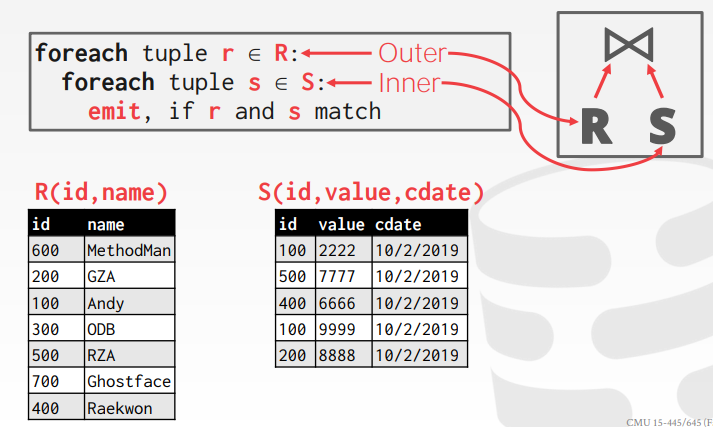
嵌套两个循环将外表的每一个元组分别跟内表中的每一个元组进行比较,如果满足条件就将其返回(我选择用一个 List 来存储结果,再依次返回)。
判断是否满足 Join 条件的方式:
1 | plan_->Predicate()->EvaluateJoin(&left_tuple, left_executor_->GetOutputSchema(), right_tuple, right_executor_->GetOutputSchema()).GetAs<bool>(); |
如果满足条件,组合 Tuple 的方式:
1 | std::vector<Value> values; |
Hash Join
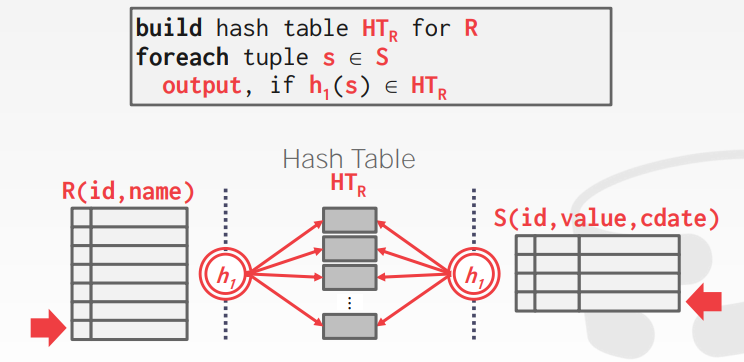
Hint 中让仿照 SimpleAggregationHashTable 实现一个 Hash Table,但是感觉好像没有什么必要,我使用了项目中提供的 HashUtil 加上一个 unordered_map 来完成。我们可以在初始化阶段将 HashTable 建立好。
注意,Hint 中提到我们需要处理多个元组的 key 是一样的情况,所以 HashTable 的声明应该是:std::unordered_map<hash_t, std::vector<Tuple>> hash_table_;,将外表中所有 join key 相同的元组存储到一起,在 Probe 时将这些元组统一跟内表中对应的元组进行比较,如果满足条件则拼装起来放入 result 中,方法跟 nested loop join 一样。
获取 join key 的方法:
1 | auto left_join_key = left_expression->Evaluate(&tuple, left_child_->GetOutputSchema()); |
Aggregation
聚合的实现需要的东西很多,但是项目都已经给出来了,在写之前先看一下 SimpleAggregationHashTable 这个类。对于每一个元组,我们只需要调用 MakeAggregateKey、MakeAggregateValue 函数,生成 aggregate_key 和 aggregate_value 然后调用 InsertCombine 函数即可,这样聚合的结果就已经计算好了,存放在 SimpleAggregationHashTable 中,可以用它的迭代器对其中每一条结果进行操作。
对于有 Having 语句的情况,使用类似的做法判断条件:
1 | plan_->GetHaving()->EvaluateAggregate(aht_iterator_.Key().group_bys_, aht_iterator_.Val().aggregates_).GetAs<bool>(); |
同样,生成元组的方式也是类似:
1 | std::vector<Value> values; |
Limit
Limit 就非常简单了,限制一下调用 Chlid_Executor 的次数就可以了。
Distinct
跟 Hash Join 类似,这里也用到了 HashUtil 加上一个 unordered_map 来实现,但现在是为了去重,所以 HashTable 中存储的东西就跟刚刚不一样了,我们将 key 相同的元组的 values 存储在其中,方便进行比较:std::unordered_map<hash_t, std::vector<std::vector<Value>>> distinct_map_{};。当从 Chlid Executor 中取出一个元组后,用 HashTable 进行去重即可,如果不是重复的就将其放入 result 中,最后依次返回。
Conclusion
在开始写 Query Execution 之前本来觉得应该非常的费时费脑,但是项目中大部分东西都已经给出,大大降低了难度。但是在自己查看 API 的过程中,发现依旧对这一块内容的理解变深了不少。在降低难度的同时还能加深理解,感谢 Andy。最后 leaderboard 还是不意外的在 100 名开外。